Posts Tagged ‘props’

In this post I will cover how to use func_TankTrain. Func_TankTrain is a brush entity available in all Source games. It is a moving train that follows a path of path_track entities.

For this tutorial you will require few things;

  • A block, which we will tie to entity func_TankTrain
  • Couple of path_track (To set the path that block will take through the world)
  • A prop_dynamic (for the purpose of this post)

Lets start by creating the path that our tank will take. To do this select the Entity Tools and in the Object dropdownlist search for ‘path_track’. Once you have found it, left click in the world to add one. Double-click the the path entity to open its properties, and give it a name e.g. path1.

path

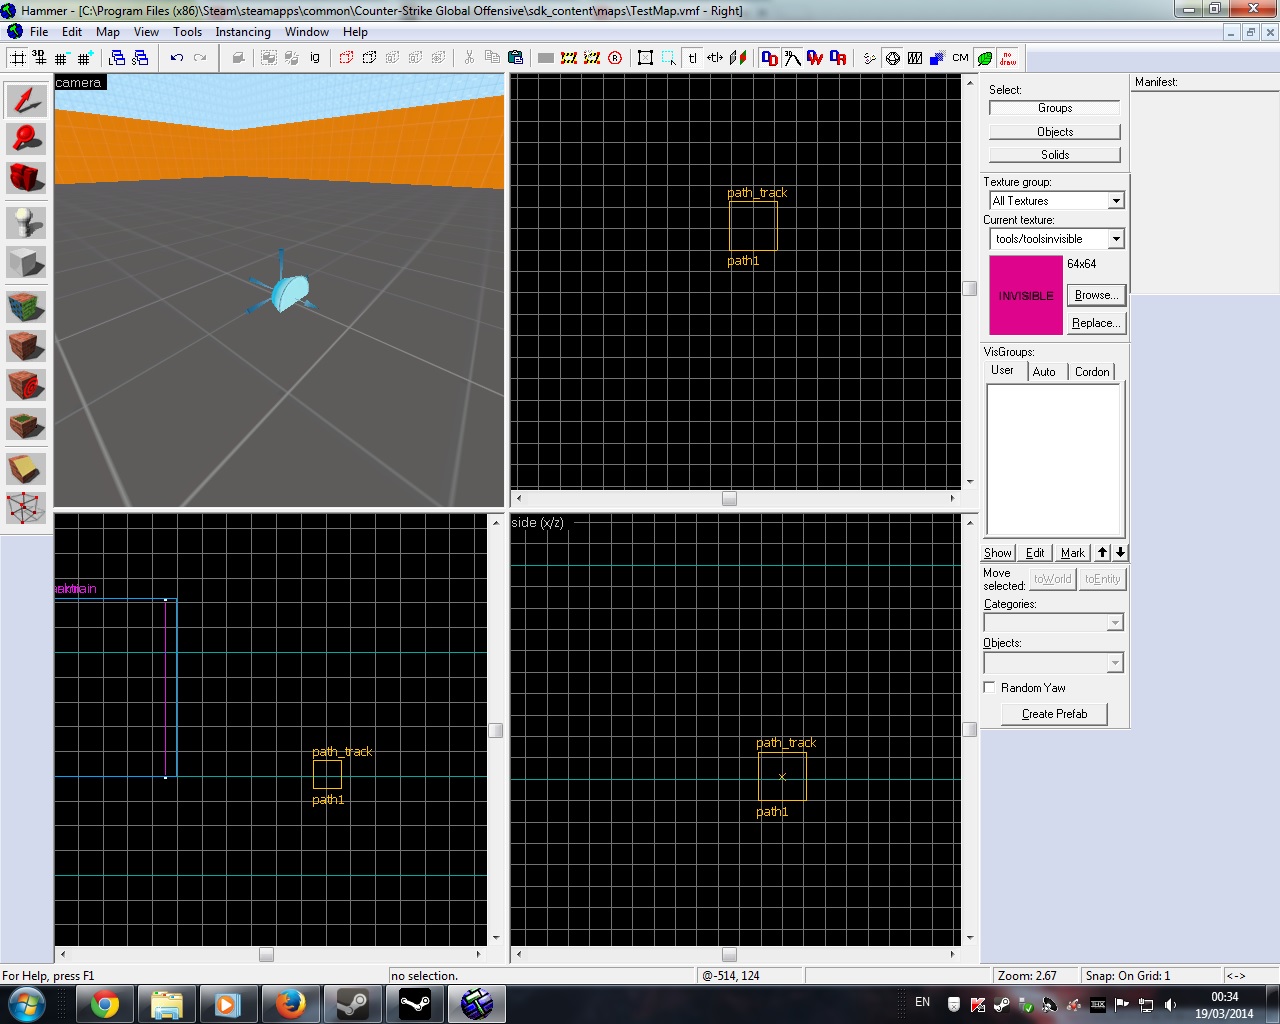
Now duplicate it be select the first path and drag it to second location. Before letting go of the right-mouse button, hold down the shift button and then let go. You will notice that a line connecting the the two paths. Also the second path_track will be given a name.

path2

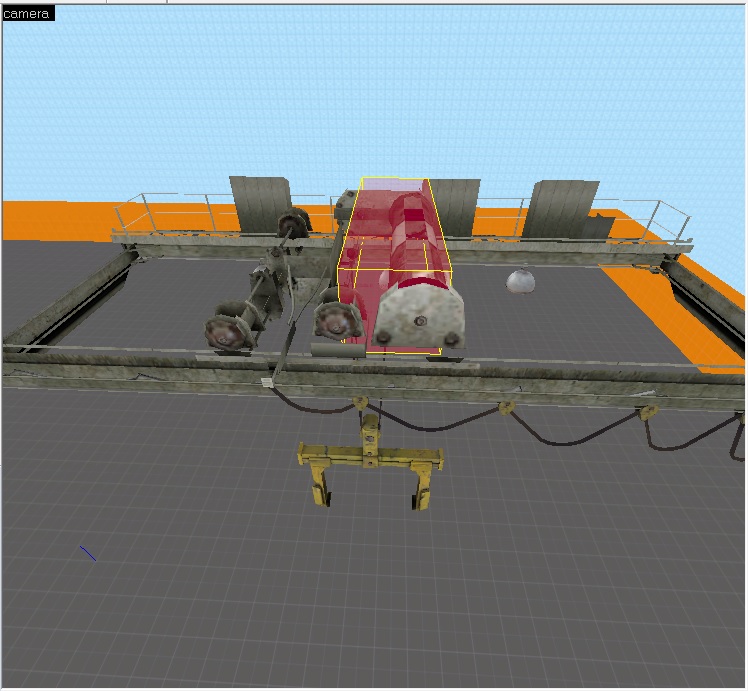
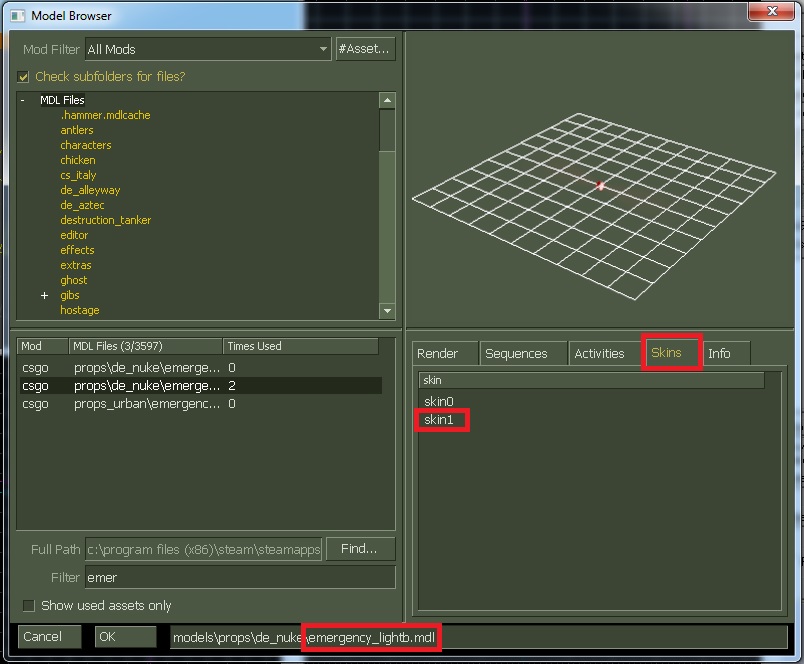
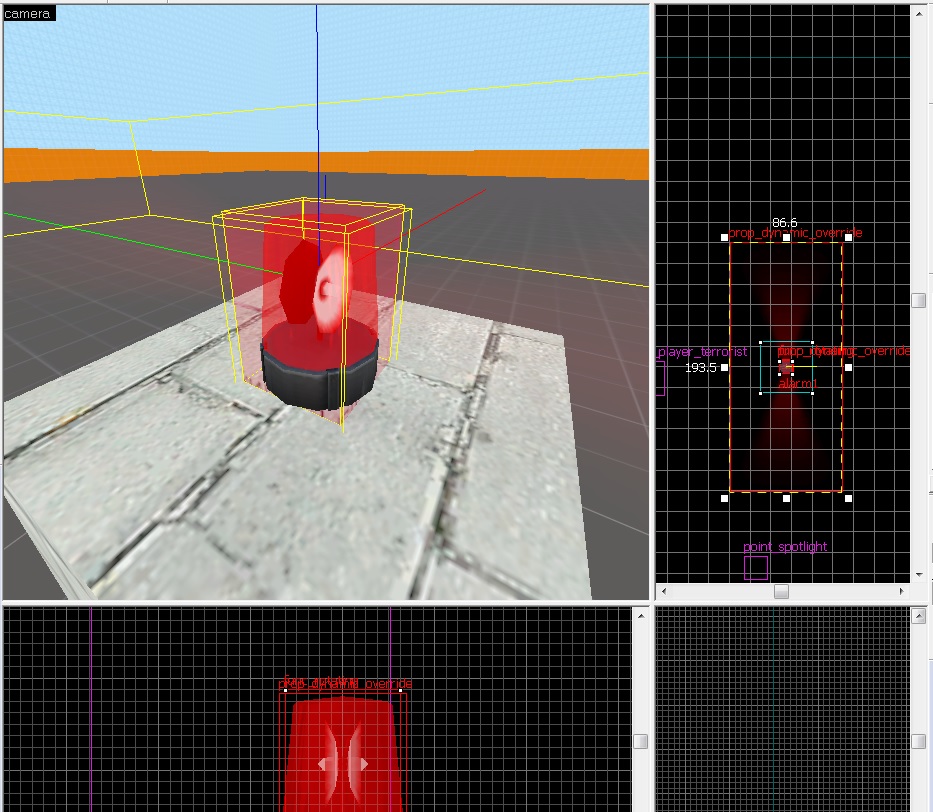
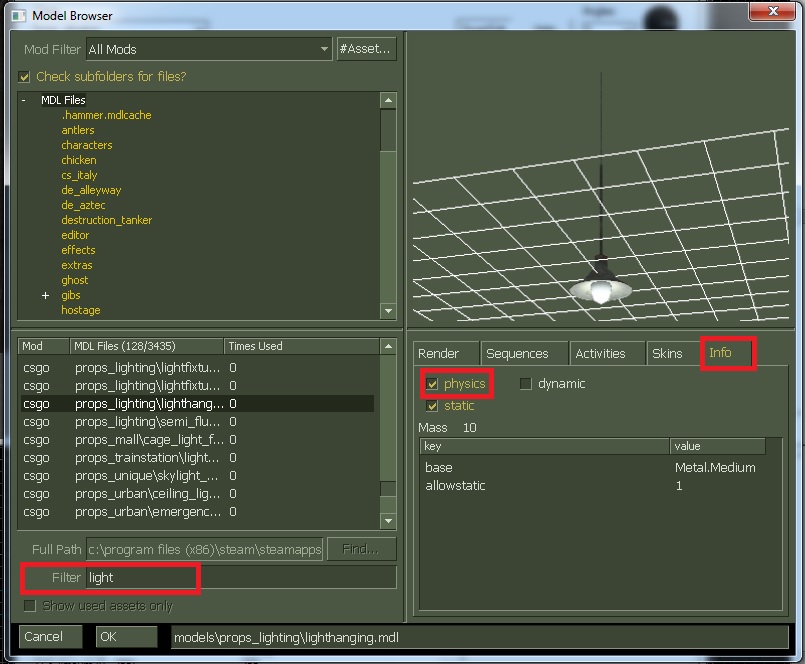
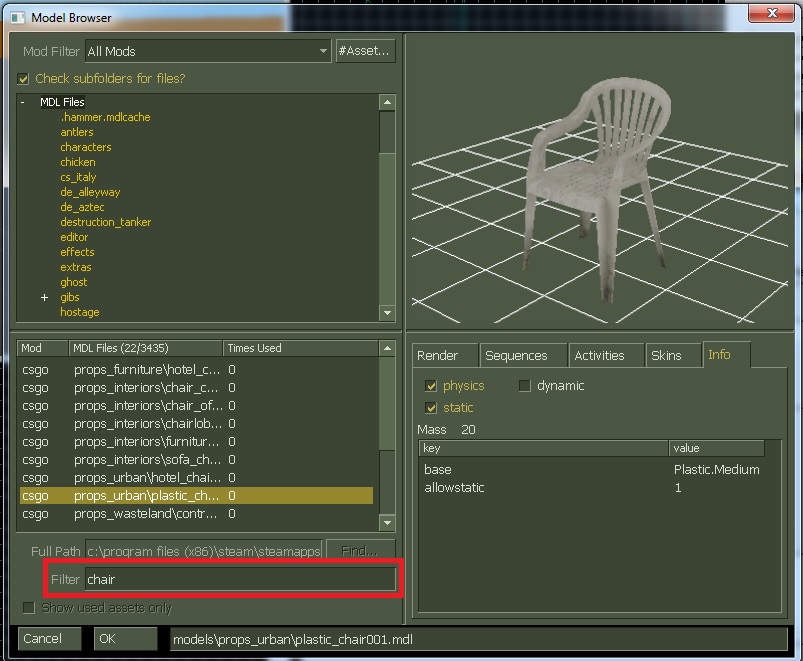
Now we move on to creating the block with func_tanktrain. I will add prop that I would want to move. Add prop_dynamic entity of your choosing, I will go with the pi_apc.mdl model.

path3

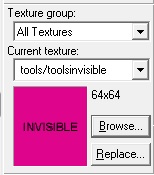
If you using an prop entity, then you will be required to create a brush that will have the invisible texture applied to it. To do this click the Browse button on the right side of the editor to open the Textures window. Filter for invisible and double click the texture to select it.

invi

Now click the Block Tool and create a template of the brush. Make sure the template covers the prop, then hit enter to create the brush. Then select the brush and hit Ctrl+T to open the object properties. Under Class dropdownlist search for ‘func_tanktrain’, select it and hit apply.

path4

Now we move on to setting the properties for the func_tanktrain. This will require some in-game testing for figure out the correct settings. Also you may need to turn the brush and the prop so that It will be facing the same direction as the path.

If you want to rotate the prop and brush, select both of them, then right click and click on Transform. A Transformation window will  open up. To Rotate make sure the Mode is set to Rotate and insert a number to the Z textbox to rotate the objects.

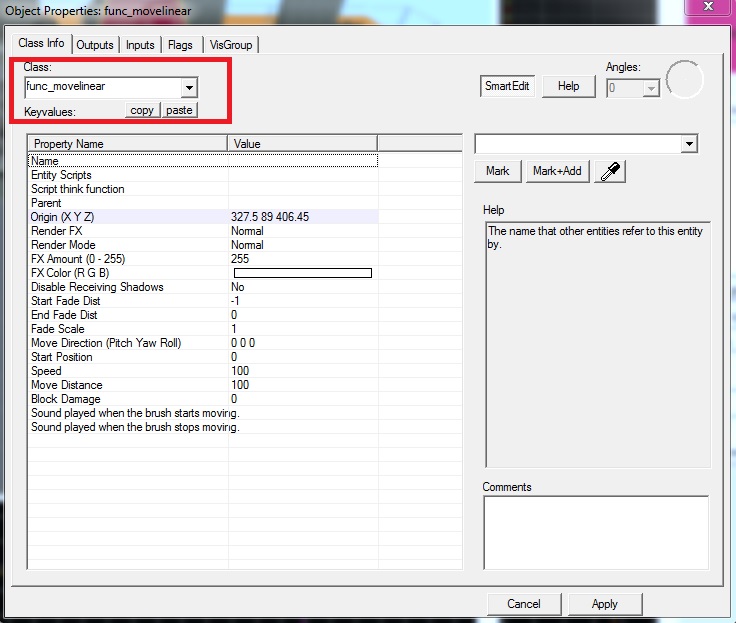
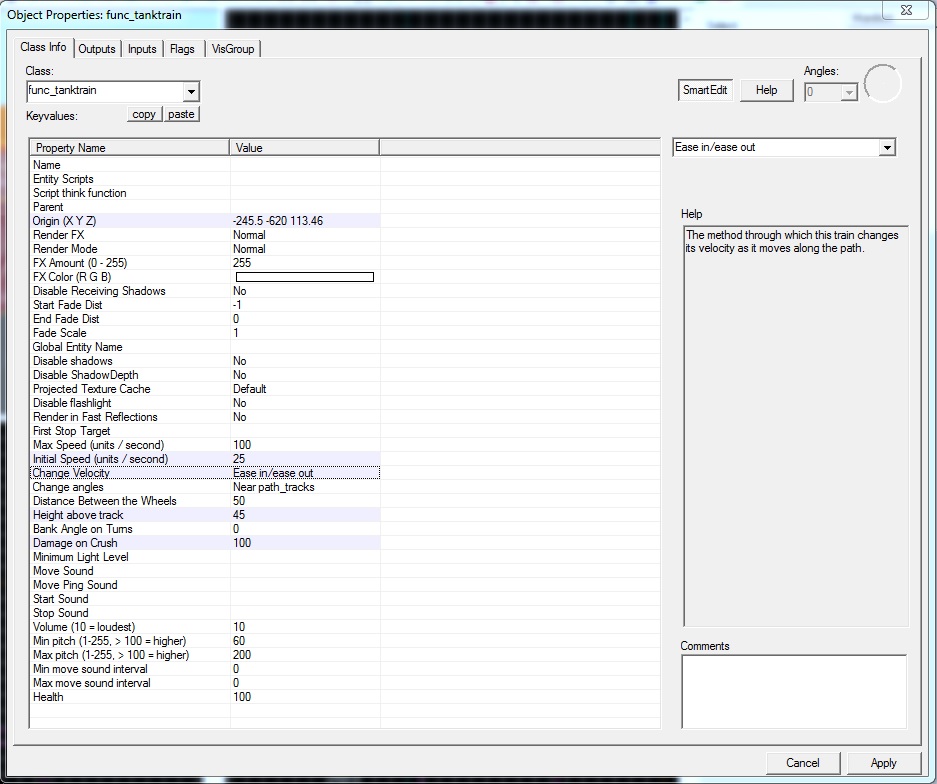
Double Click the brush to open its properties. Here are few properties to take into account;

  • First Stop Target – The name of the first path_track in the train’s path. The train will spawn at this path_track. It will also turn to face direction indicated by the ‘Orientation Type’ setting.
  • Max Speed – The maximum speed that this train can move. Any speeds applied to this train, such as by path_tracks or SetSpeed inputs, will be clipped to this maximum value.
  • Initial Speed – The speed that the train will move at after it spawns, 0 = stopped.
  • Change Velocity – The method through which this train changes its velocity as it moves along the path.
  • Damage on Crush – The amount of damage this train does to entities that block it.
  • Health – The amount of health the entity has. Which can be drained when players do damage to it.
  • Start/Stop/Move Sound – A sound played when the train stops/starts/moving.
  • Height Above the Track – The height above the track that this train moves.

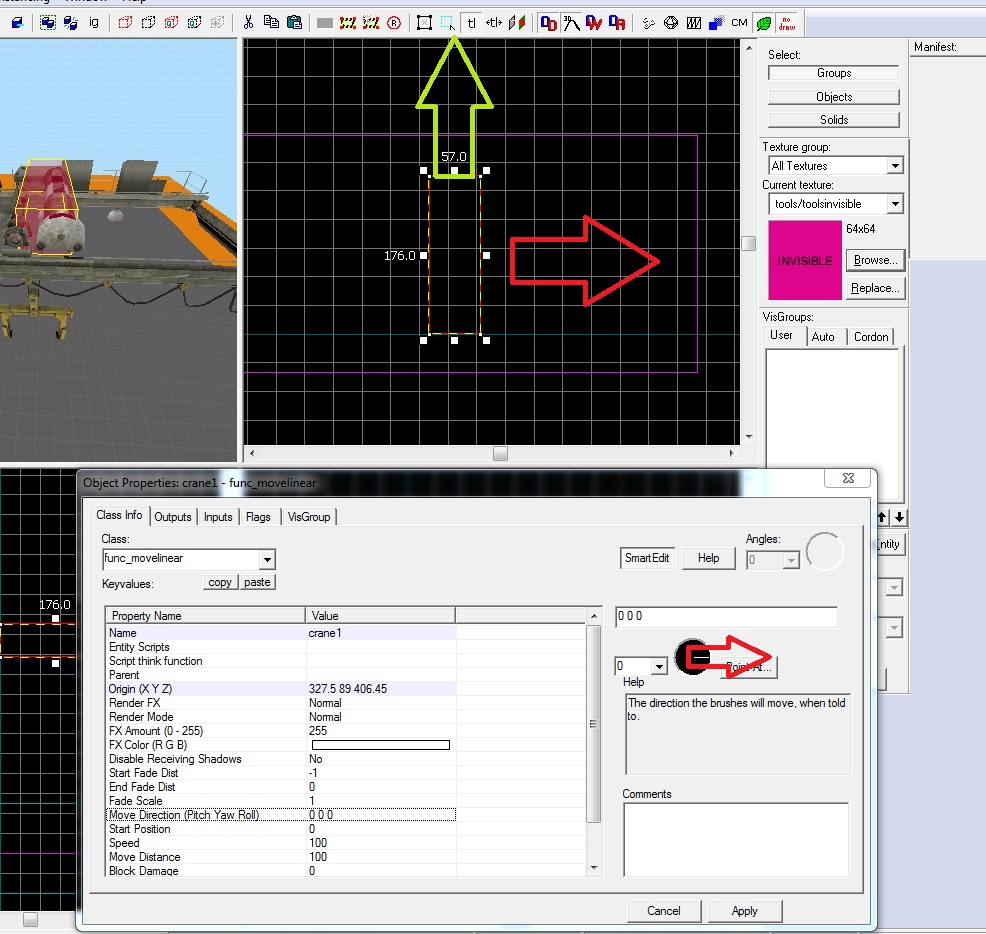
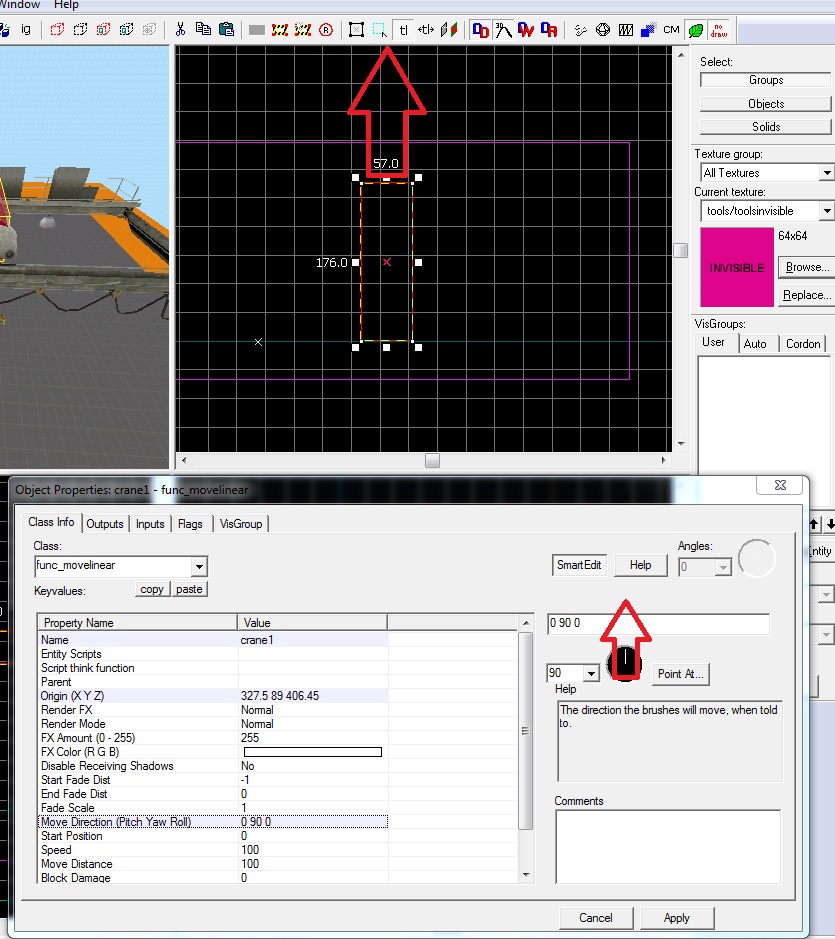
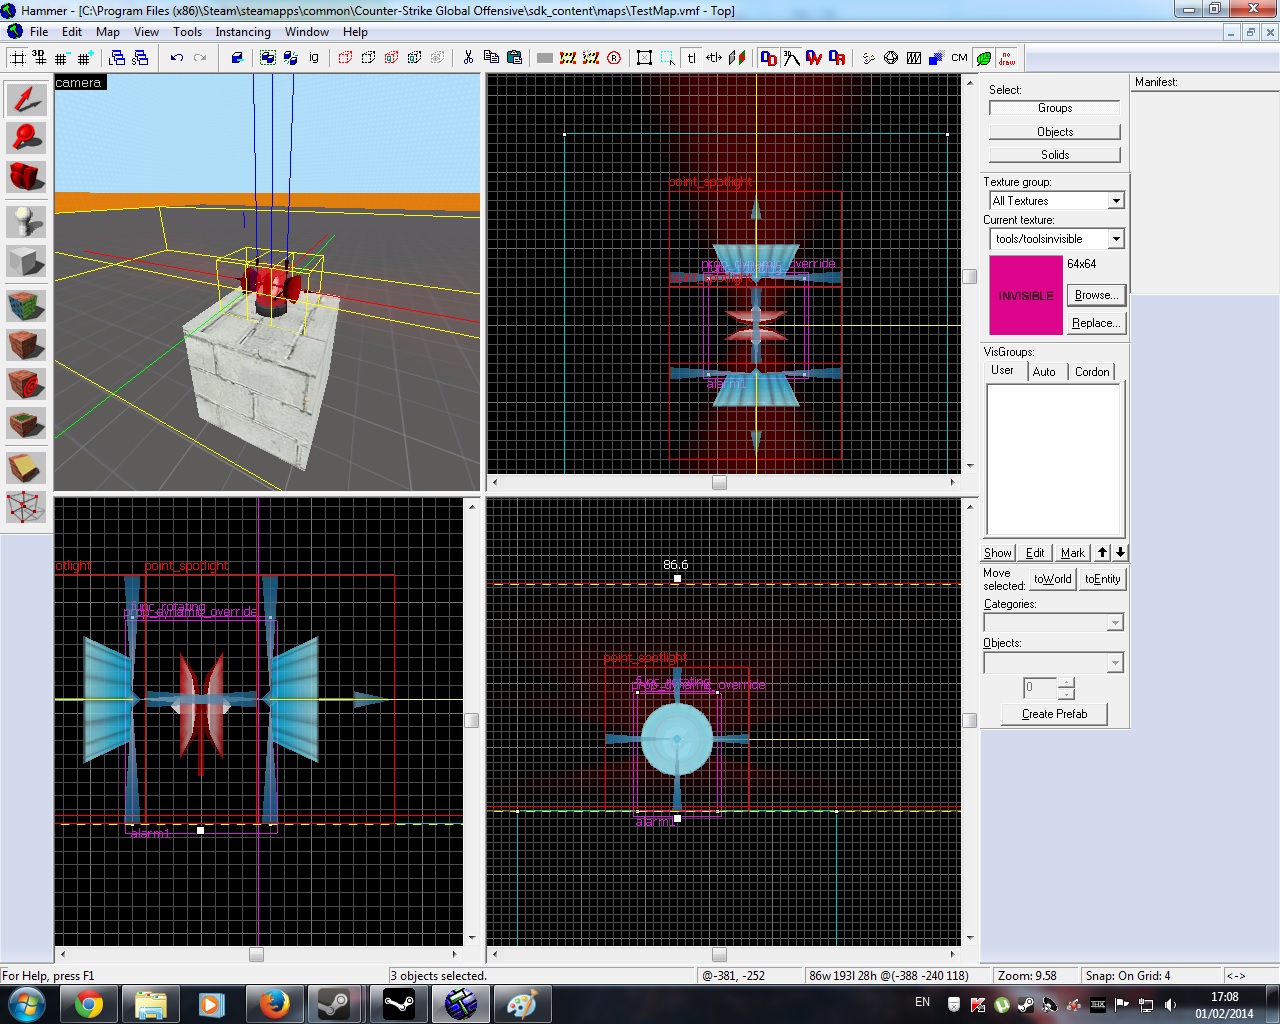
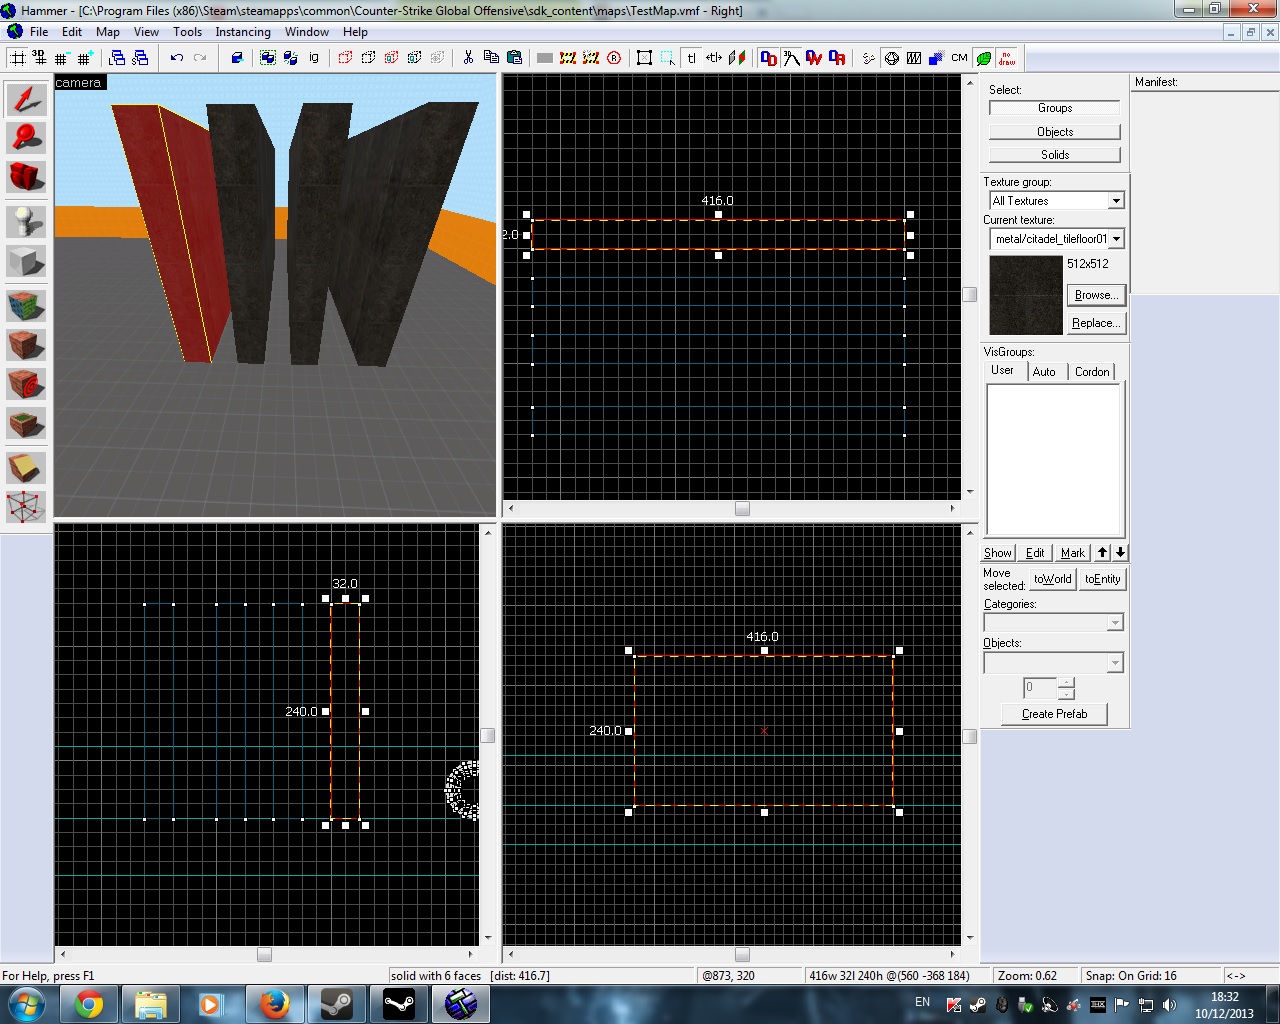
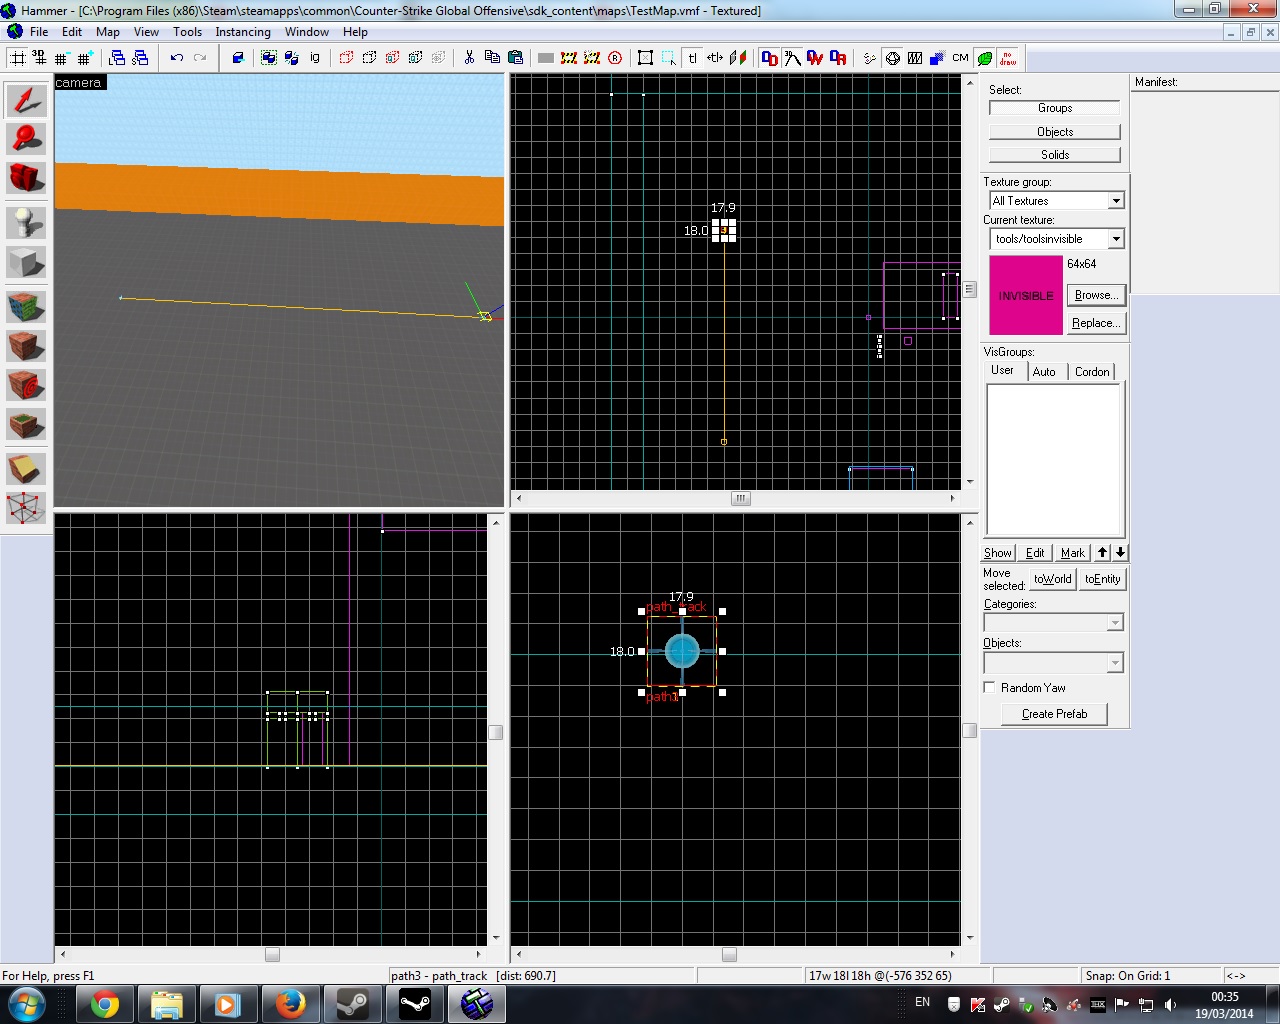
For the purpose of this post I will only set the important properties. Lets start with Height above the Track, to measure this use the side or the front viewport and create a template from the floor brush to the centre of the tanktrain brush.

path5

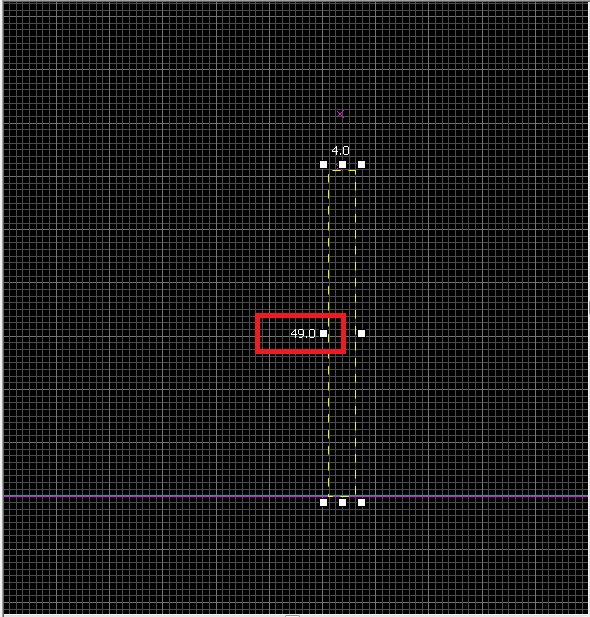
Set the Height above the Track to equal the value in the red rectangle (If the prop is not touching the ground or is within the ground, then you will need to come back and add or take away from this value).

We’ll leave Max speed to its default value of 100 and set the Initial speed to 50 (It’s important to set the initial speed or the tanktrain will just jump between the track points). Will set the Change velcitiy to Ease in/ease out, so the looks like starts slow, speeds up and then as it gets closer to the second path_track slows down.

Now we will set the First Stop Target (starting point of the tracktrain), which will be the first path_track entity (path1).

Will also set the damage crush to be 100 with the flag setting of it being unstoppable by player, this can be found under the Flags tab.

path6

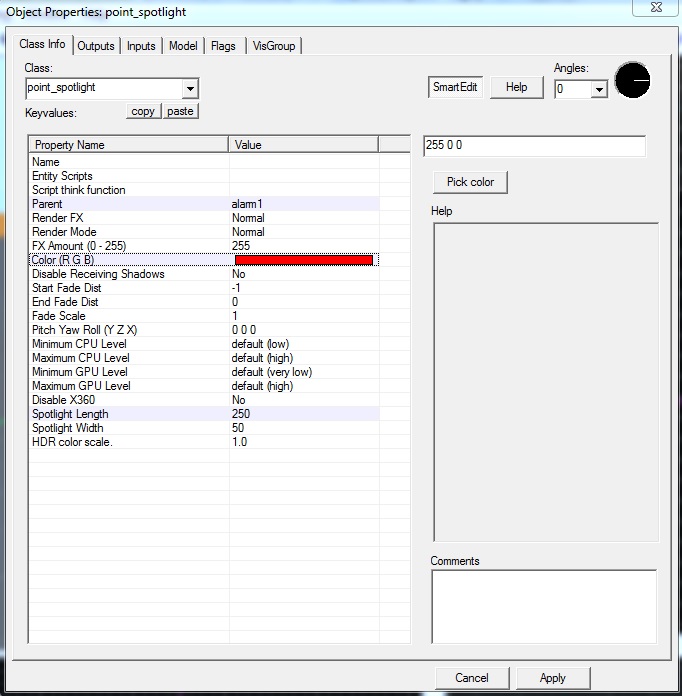
To parent the prop to the brush, you will need to give the brush a name (e.g. apc) and in the prop properties under parent set it to equal that name.

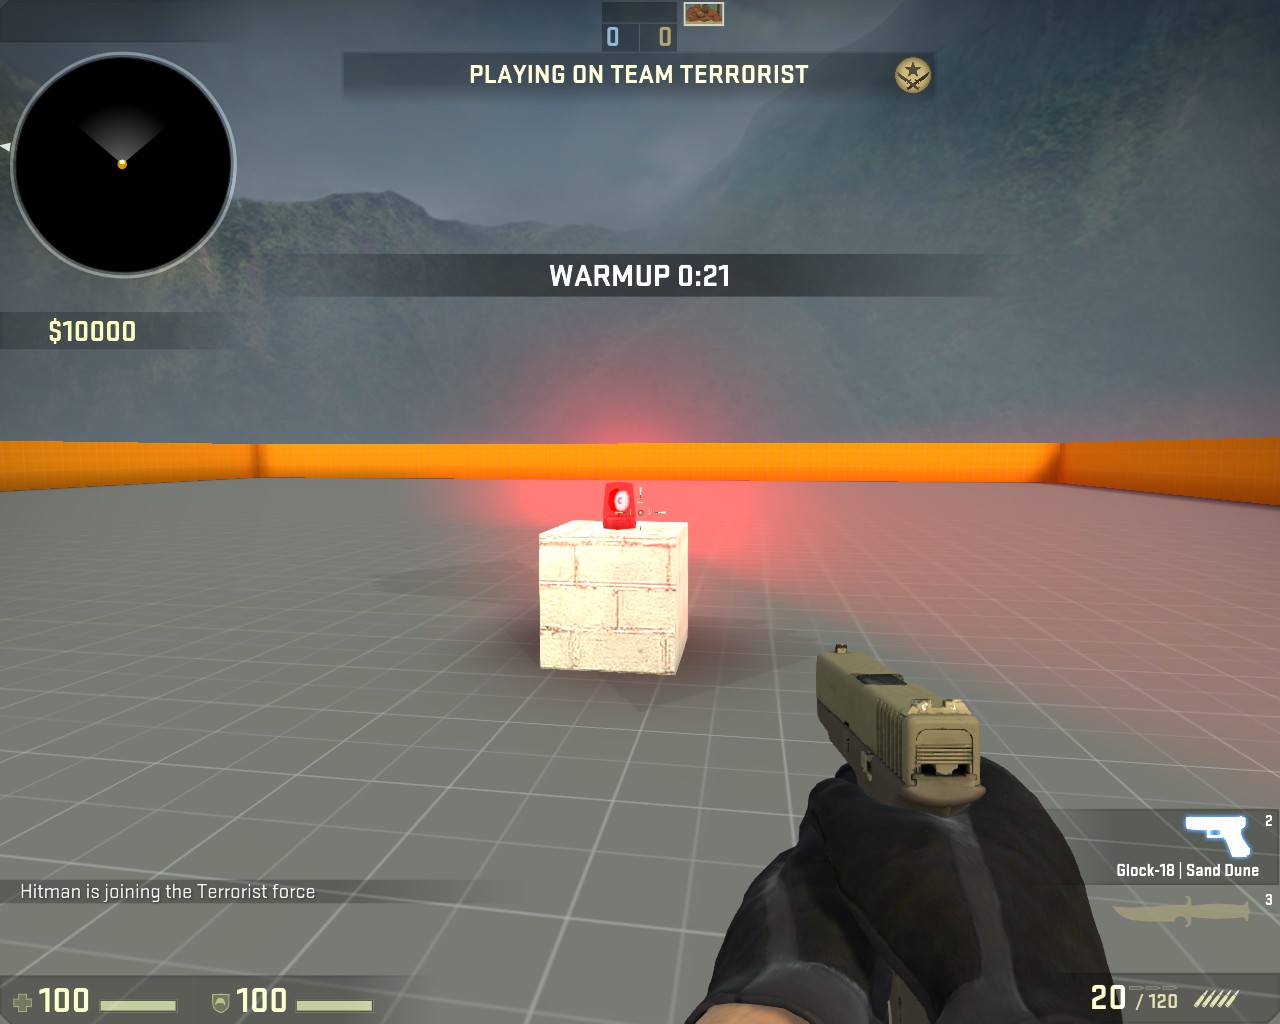
Compile and run the level.
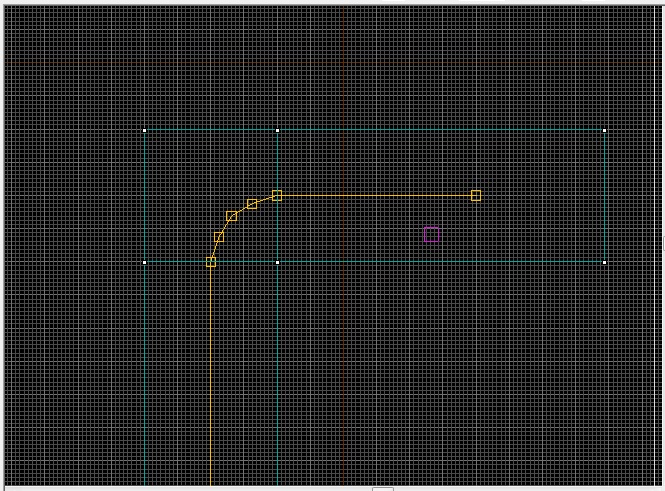
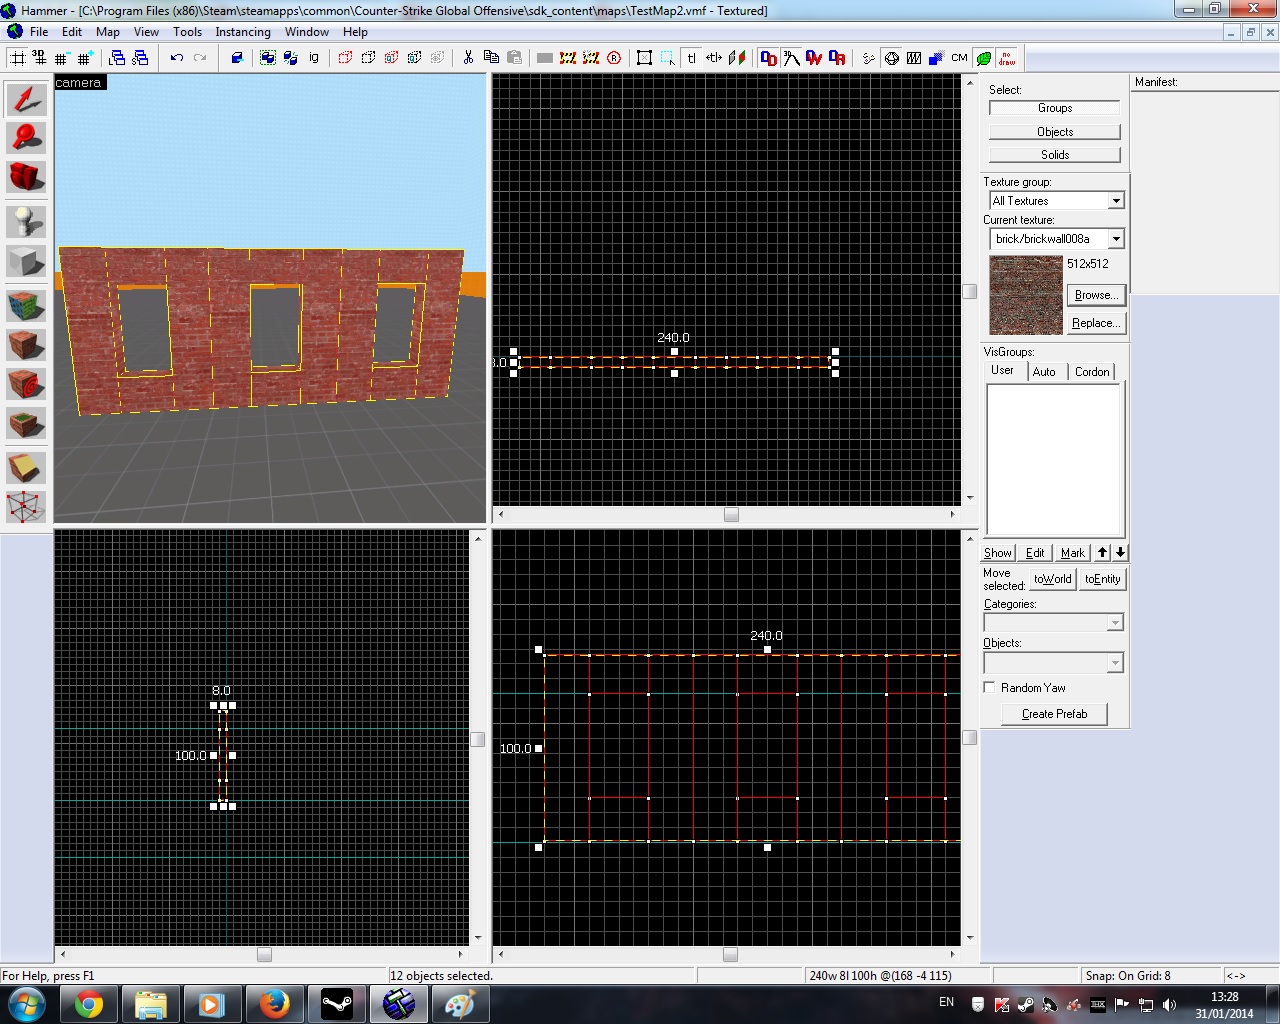
 

Complex Path

If you plan to make a route that goes through a road that that has corners then I recommend using more than one path_track at the corner to make the animation of the turn smoother. The more you add the smoother it will get Like so;

path7

In this post will teach you how to move objects using func_movelinear. This can be used to create many things like; cranes, lifts, moving props that do not have an animation and other things. If you want to use a vehicle prop, then I recommend you check if the prop has animation first. If not then use func_tanktrain. Which I will cover later on.

For purpose of the this demonstration, I will be using func_movelinear to create a crane. For this you will need;

  • A prop_dynamic prop
  • A Brush with the invisible Texture applied.

Lets start with by selecting the Entity Tools and Filter for prop_dynamic in the Objects dropdownlist. Left-Click in the world to add the entity. Double click the entity to open the properties, and under World Model select the Browse button to open the Model Browser.

In the model browser filter for ‘Crane’ and select the first one by double clicking on it (de_nuke\craneb.mdl). Once you have it selected, hit Apply.

crane

Now we move on to creating a the brush. First select the invisible texture by clicking the Browse button at the right side of the hammer editor to open the Textures window. Use ‘invisible’ in the filter and double click the invisible texture.

invi

Now select the Block Tool and create a template the covers top part of the crane prop. Then hit enter to create brush.  Like so;

crane2

You can resize the brush if you like to only cover small part of the crane. Just make sure that brush is at the centre of the prop. In the end it is up to you, either way you will require to parent the crane to the brush.

crane3

Select the brush and hit Crtl+T to open the object properties because we will want to tie to an entity func_movelinear to the brush. Filter the class dropdownlist for func_movelinear and hit apply

movelinear

Give the brush entity a name (e.g. crane1). The properties that you will need to take into account are;

  • Speed – Speed the brush moves.
  • Move Distance – Distance the you want to brush to move.
  • Move Direction – The direction you want the brush to move.

Speed can be set easily, lower the value the slower it will move.

To identify the direction you want the brush to move, you will need to select Move Direction field and use the top viewport to find the right direction. From the image below you will notice that default move direction is set to the right (identified by the red arrow) but we want the crane to move in upper direction (green).

direction

To do this select Move Direction and direct the hinge up, like so;

direction2

Distance is simple but it requires come calculation. Distance is amount grid squares the brush will have to travel. To calculate it, look at the top viewport and drag a template from where the brush starts to where you want the brush to end, like so;

distance

The value in the red rectangle is the distance.

Only thing left to do is open up the prop_dynamic properties and set its parent value to equal the brush name (crane1).

Here is test video from one of my maps, where I use metal blocks to activate the crane forward and backwards;

In this post will show you how to make Alarm Light, like this;

2014-02-01_00002

This post will also teach you how to create rotating brushes by tying the brush into an entity. For this you will require few things;

  1. Two prop_dynamic_overrides.
  2. Small brush (size of the prop) that has the Invisible texture applied to it.
  3. Two point_spotlights

Lets starts by adding the brush.  Select the browse button to open up the Textures window. Filter for ‘invisible’ and double click on it to select it. Create a small rectangle template (10 Width, 10 Length, 15 Height) and hit Enter to create the brush.

After yo have done that select the brush and hit Ctrl + T. This will open the object properties. Search for ‘func_rotating’ in the Class drop down list and hit Apply. In the properties there are few thing that will be required to change and set.

  • Set the name to alarm1
  • Set the Max Rotation Speed to 360
  • Under the Flag tab tick the Start On box
  • Under the Flag tab un-tick the Large Sound Radius

Now we move on to adding the props. Click the Entity Tool or Shift + E, and filter for prop_dynamic_override. Left-click in your level twice to add two. Select one of them and open up the properties. Under World Model select Browse to open the Model Browser. Filter for emergency and select emergency_lighta.mdl.

Select the other entity and do the same thing but instead select emergency_lightb.mdl. Also under the Skins tab and select the second skin (skin1). Then hit OK and then in properties set the parent to be the name of the rotating brush , and then hit apply.

p16

Make sure they are within each other;

ap1

Final part is the lighting. Select the Entity Tool or shift + E, and left click in your level. Open the entity properties and do these settings;

  • Set the parent to alarm1.
  • Change value of Spotlight length to 250.
  • Change the colour of the light to red.

ap2

Reposition the light close to entity and make it face the light represented in the entity. Also create a duplicate the light to face the other direction.

ap3

Compile and Run the game to view it in-game.

2014-02-01_00001

In this post I will teach you on how to add three different types of breakable windows which are provided in Counter Strike: Global Offensive hammer editor.

The types are:

  1. Breakable Brush Window.
  2. Breakable surf Brush Window (like in CS_Office).
  3. Prop Window.

Before starting, recommend creating space to add window. Like so;

w1

Prop Window

We will start with the easier one. This will simply require two entity types. A prop_physics_multiplayer and four phys_ballsocket.

Select the Entity Tool or Shift + E, then filter in through the dropdown list for prop_physics_multiplayer. Left click in your level to add. Now that you have added a prop_physics_multiplayer you will need to set the world model. Double click the entity to open the properties. Under World Model select Browse to open the Model Browser. Filter for ‘window’. Under the info tab search for model that allows physics properties. (I’m going with window_industrial.mdl). once you have found it select OK, then give the entity a name (e.g. wind1)  and hit Apply.

Resize the brushes to fit your window

w2

Now that you have window inserted, you will need to attach it to the brushes around it so it wont fall off. That is where you will need the four phys_ballsocket. Select the entity tool and filter for ‘phys_ballsocket’ and place one on the top, bottom, left and right side of window. Like so;

w3

Enter select them all and open their properties. You will need to set the Entity 1 to the name of the window (which I choose to be wind1)

w4

Compile and run the game to test it.

Breakable and Breakable_Surf Brush Window

For this we need to create a brush that will be in the centre and them tie that brush into an entity. So select the browse button from right side of the editor to open the Texture window. Filter for ‘nodraw’ and double click the texture to select it.

Now that you have the texture, select the Block Tool or Shift + B, and create a template within the other brushes (window). I recommend it to be 2-4 units thick and as high as you want. Then right click and select create object or hit Enter.

w5

Now you have two choices;

  • func_breakable
  • func_breakable_Surf, like the windows in CS_Office which break into small crystals.

You require to add glass to the brush (window), do this by opening the Face Edit Sheet by selecting the Toggle texture Application or Shift + A. Then select the browse button to open the Textures window. Filter for ‘glass’

There are one glass texture that will work with func_breakable_surf. There are also few textures that do not allow the brush to break. This image shows you which work with what, choose carefully;

w6

  • Red – Wont work with any breakable brush.
  • Green – Only works with func_breakable.
  • Purple – Works with func_breakable and func_breakable_surf.

func_breakable

Once you have selected the glass texture, apply it on both sides of the brush (window). I recommend setting the texture to fit or centre the brush. Then select the window brush and hit Crtl + T to open the object properties window. Search for func_breakable under the class drop down list, then hit apply.

func_breakable_Surf

While for func_breakable_surf, apply the glass texture to only one side of the brush (window) leaving the other side to have nodraw. Select the brush and hit Ctrl+T to open the object properties window. Search for func_breakable_surf under the class drop down list and then hit apply.

On one side of window brushes difference between breakable and breakable_surf.

w7


Compile and run the game to see the affects.

Extra Information

Here are few things you can change within the window brush properties;

  • Parent – To attach it moving objects
  • Material Type – Could change the material type to something else when it breaks.
  • Health/Strength – Is the amount of damage brush can take before it breaks.

In this post I will teach you how to add different set of doors. Doors do require some in-game testing so you can get them right.

CS:GO SDK has two options for doors. Adding doors either by;

  • Models/Props (Using door models that are provided with the game)
  • Tying brushes to a door entity. (If you want a sliding doors or door with particular texture)

Using models is the easiest way of adding doors, just add prop_door_rotating entity. While brushes you will need to tie it to an entity but its more practical.

Adding Doors (Model/Prop)

Select the Entity Tool and search in the object drop down list (located in the bottom right of the hammer editor) for prop_door_rotating. Left-click in the world to add, it should add a purple cube.

door1

Now double click the entity to open the properties window.

door2

Select the World Model field and then click the browse button to open the Model Browser. Filter for ‘door’ and select the appropriate door. In the case of this tutorial I am going to select the doormain01_static.mdl model.

door3

Once you have found a model, hit OK on the model browser and then select apply. The model should display in the world, reposition it if required.

Adding Doors(Brushes)

To do this you will first be required to make a brush. Select a reasonable texture (I’d go with a dev texture) and create a brush that is 2 units wide, 55 units long and 104 units high. (Use prop door model to get the measurements)

door4

Now that you have a brush, you will want to add a door texture. Select Toggle Texture Application or Shift+A to open Face Edit Sheet. Click Browse button to open the textures window. Search for ‘Door’ and select a texture and apply it to the brush by right clicking on the brush surface (align the texture if required by using justify or measurements features) .

door5

Once that is done, we move on to tying the brush to an entity. There are two options;

Normal Rotating Doors – You can tie it to work like normal rotating door by selecting the brush and hitting Crtl+T to open the object properties. Then from the class drop down list search for func_door_rotating, hit apply and you will notice a purple sphere show on the brush/door.

door6

The sphere represents the rotation point of where the door will rotate around. So you are required to move the point(sphere) to the edge of the brush. Use the top viewport to move the sphere.

door7

Sliding Doors – If you want to create a sliding door (e.g elevator door or spaceship door) then you need to Tie the brush to func_door entity. To do that select your brush and hit Ctrl+T. This will open the object properties. Search under the class drop down list for ‘func_door’, once found hit apply.

door8

To make the door slide you will need to set the Move Direction (Pitch Yaw Roll) field. This will require some in-game testing to figure out which direction you want the door to moves when you use action key. You can use measurer located on the top right of properties window to set the direction.

door9

We are  done once you have figured out the direction.

Extra

There are few fields and states that you would like to experiment with when using doors. Here are few:

  • Under Class Info Tab;
    • Parent – The name of this entity’s parent in the movement hierarchy. Entities with parents move with their parent.
    • Speed – The speed at which the door moves.
    • Spawn Position – set if the door is open or closed when it at the start.
    • Unlocked Sound & Locked Sound – Set them to play a sound to give indication if the door is locked or unlocked.
    • Health/Strength – Allows the door to become breakable.
  • Under Flags Tab;
    • Starts Open – This door spawns open.
    • Non-solid to Player – The player does not collide with this door.
    • Passable – Nothing collides with this door.
    • Toggle – The door is given an input to change this door between open and shut.
    • Use Opens and Use closes – The +use key, when in range, triggers this door.
    • NPCs Can’t – NPCs can’t open this door.
    • Touch Opens – When a player or NPC collides with this door, it is triggered.
    • Starts locked – This door spawns locked and cannot be opened by the player or NPC (but buttons can still trigger it)
    • Door Silent – This door makes no noise  (No sound, and does not alert NPCs).
    • Ignore player +USE – Makes the door ignore players +use
    • Start Unbreakable – Makes the door breakable. (Only works on certain prop models and requires door having health/strength)


During the lighting post I did not give tutorial light_dynamic, and did not give tutorial for prop_physics during the prop post. The reason for this is require explaining props and lighting before giving tutorial as require abit of each when it comes to use them in CS:GO SDK. So I’ll give a tutorial on how to add physical ceiling light.

Previous Posts:

Physical Ceiling Light

Entities required are:

  • light_dynamic.
  • prop_physics.
  • phys_ballsocket – It simulates a rigid connection between the centre of its constrained entities and its own location that prevents them from changing relative distance and makes their rotation point its own location.
  • Building (Made up from brushes/walls).
  • (optional) point_spotlight (for effect).

Step 1 – Building a Dark Room

We start by creating a dark room to add our light into to see the effect more clearly. Start by select a texture by selecting browse from the right side of the hammer editor to call the Textures window. Preferred a dark or a grey texture, up to you (I’ll be going with ‘metal/citadel_tilefloor016a’)

darktext

Now move on to the building. Select the Block Tool or [Shift + B] blocktool. Then make sure that Objects drop down list on the bottom right side of hammer editor is set to ‘Block’. Then create four big walls and a roof.

A fast way of making four walls is by duplicate a single wall into four, and turn two of the walls 90 degrees. To duplicate select the object/brush, drag the brush somewhere on the map and while hold shift, release the left mouse button.
duplicate

To turn/rotate the object, right click the object/brush and select Transform and a small window will pop up. Make sure to Mode is set to Rotate and set the Z value to 90 then click OK.

rotate

Then all you have to do is connect together with no gaps and add a roof block. Should look like this from the inside;

building

Step 2 – Adding Physics light model

Select the entity tool, and filter for prop_physics and then left click on the roof block. In the prop entity properties under World Model select Browse button. Filter for ‘light’. While you have the info tab selected look for light model that is compatable with physics.

physics

Once you have found one click OK on the Model Browser. Give the prop entity a name (e.g. light1) and then select apply in the properties. You may need to rearrange the position of the entity to fit the world.

light

Step 3 – Adding a phys_ballsocket 

This is basically a connector, which is connecting physics object to the wall. Select the entity tools and filter in the bottom right side of hammer editor, in the objects drop down list for ‘phys_ballsocket’. Left click on the roof block to add the entity. Then rearrange position to be directly above the physics prop entity. like so;

socket

Then enter phys_ballsocket properties. Then set the Entity 1 field value to equal the physics prop entity name, which you gave (e.g. light1)

ballsocket

Then select Apply.

Step 4 – Adding light_dynamic

Select the entity tool and filter for ‘light_dynamic’, then left click in the world to add the entity. Position it to be set under the light model entity and make sure that centre x marker of light_dynamic entity is not within parameters of the light model entity. Like so:

lightdyn

Once that is done we move on to setting the light_dynamic entity values. Go into its properties by double clicking the entity.

properties

You will need to set the values of:

  • Parent to equal the light model entity (in my example is light1).
  • The inner and outer values to cover more surface area (60 for inner and 75 for outer is good)
  • Brightness (requires some in-game testing to get the best value)
  • Pitch Yawn Roll – 90 0 0 (Facing down)

properties2

Finally you need to set the Maximum Distance to view the affect light. To do this once you have selected the light_dynamic entity, you will notice a yellow circle in the side,front and top views or yellow sphere in the texture view. Select a white square from either the side or front view and stretch it until it inner and outer  emission lights are within the sphere.

maximum distance

Now test it by running the map.

(Optional) Step 5 – Adding point_spotlight

Select the entity tool and filter for point_spotlight. Add it to the world by left clicking and position it in the same position as the light_dynamic entity. Within its properties set these values:

  • Parent – light1.
  • Spotlight length 100, keep the Spotlight With on 50.
  • Pitch Yawn Roll – 90 0 0 (Make sure the spotlight is facing down)

In-game shots

2013-12-19_00001(Light emitting at me after being shot)

2013-12-19_00002(Light going in the other direction)

In this post I will cover props. Props are model entities. I will go though the types of props available in Counter-Strike: Global Offensive-SDK. I will go though how to use them properly within the editor.

There many different types of props available in SDK, these are the types:

  • prop_detailed – Detail geometry – static models that do not move. Do not contain any physics properties or collision data. Cannot break. Do not cast shadows. Can be automatically placed by assigning a detail type to a material. Generally not placed individually by level designers. The least expensive geometry to render. These may not even be rendered on low-end machines. (e.g. grass, rocks and plants)
  • prop_static – Static geometry – models that do not move. Does not contain physics properties other than collision, and cannot break. Cannot have any joints or animation. Casts lightmap shadows. Inexpensive geometry to render. (e.g. pipes, light fixtures, rocks and telephone poles)
  • prop_dynamic – Models that can be placed in hierarchy and can have joints and play animations. Can also be configured to break when taking enough damage. Can be hierarchically attached to other objects. Can cast dynamic shadows. More expensive than static geometry, less expensive than physics geometry. (Used for models that have animation such as Robotic arms etc…)
  • prop_physics – Models with built-in physical properties. Moves and collides using the rigid-body physics system. Can be constrained to other physics objects using hinges or other constraints. It can also be configured to break when it takes enough damage. Casts dynamics shadows. Expensive to move and render. (e.g. barrels, small debris and furniture)
  • prop_ragdoll – Physics props with ragdoll physics skeletons. Have all the properties of physics props and can also use the rigid body ragdoll physics system to have multiple colliding or bending parts. Very expensive to move and render. (e.g. Corpses, multi-piece cardboard boxes and mattresses)
  • prop_physics_multiplayer – Physics props using a simplified physics collision system designed for multiplayer games. Have less networking overhead than standard physics props, necessary for the bandwidth-limited environment of multiplayer games.
  • prop_dynamic_override – Special prop type used to convert a model that is designed to be used as a prop_static, and giving it the properties of a prop_dynamic. Has identical cost of a prop_dynamic.

Inserting Prop Models

To add a prop model, first select the entity tool

Then on the right hand side of the hammer editor, use the objects drop down menu filter for the entity you want to place. Choose either prop_static, prop_physics, prop_physics_multiplayer, prop_dynamic_override, prop_ragdoll or prop_dynamic.

In perspective/Texture viewport, left click to place the entity.Now we will have a place holder for a prop model. Double click on the red entity place holder. In object properties for the model prop, select World Model and click on Browse.

prop

Model Browser will open up, and then you are able to choose a model from the hundreds of models available. Use the filter option to type in a search for specific models you are looking for.prop2

Depending on which prop entity you chose (static, dynamic or physics) click over to Info tab to see if that prop model supports your prop type. (If dynamic it will also support prop_ragdoll, prop_dynamic_override. Else if physics then it will support prop_physics_multiplayer)

prop3

Once you have the model you want, select OK on Model Browser, then Apply on the entity properties.

Hints:

  • If adding physics models, use prop_physics_multiplayer instead of prop_physics.
  • On certain light models its best to use them as prop_dynamic_override instead of prop_static.

Inserting Prop_Dynamic (Animation)

To add animated object first need to search for object that has animation to it. Add an prop_dynamic entity.

In object properties for the model prop, select World Model and click on Browse. In purpose of this tutorial filer for ‘helicopter’. You will notice that under the sequences tab there are few different sequential events.

animationThese events are the animation that mode can perform. So to allow animation on the model need to first select this model then click OK in the Model Browser. As you return to the the models’ properties window search for field Default Animation and set the parameter to equal one of the sequences, like so (I have set it to 3ready):

animation2

Once you have set the Default Animation, then it’s done. Select Apply to finish.

Hint: If a model does have an animation, but the only sequence is idle then set the default animation of the entity to idle.