Posts Tagged ‘level building’

In this post I will show you how to add and config sound entities to your Counter-Strike: Global Offensive level.

In CS:GO there are several sound entities;

  • env_soundscape.
  • env_soundscape_proxy.
  • env_soundscape_trigger.
  • ambient_generic.

But will focus on ambient_generic and env_soundscape (env_soundscape_proxy and env_soundscape_trigger are similar to env_soundscape).

sound

(env_soundscape – ambient_genetic)

env_soundscape – Is a point entity available in all Source games. It changes the active soundscape of players, and defines where positioned sounds within it play from.

env_soundscape_proxy – It is an env_soundscape that inherits all of its properties except radius from another entity. This is useful when dealing with an area that doesn’t have clear line of sight, and so requires several identical soundscape entities.

soundscape

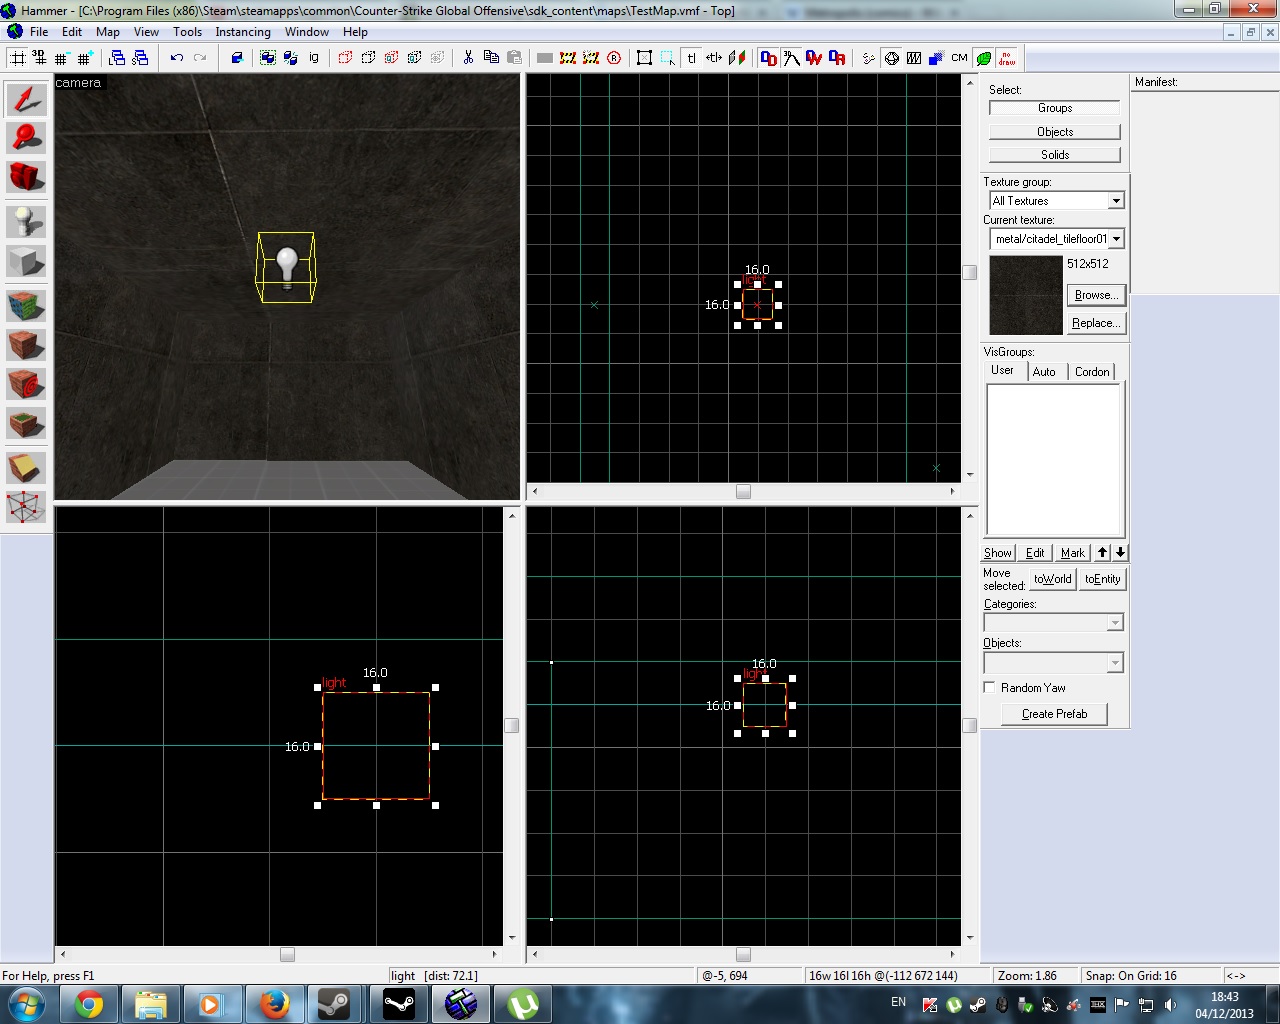
OK let me show how to add one. Select the entity tool and search in the objects dropdownlist for ‘env_soundscape’, then left click in the level to add the entity. Double click the entity to open its properties;

soundscapprop

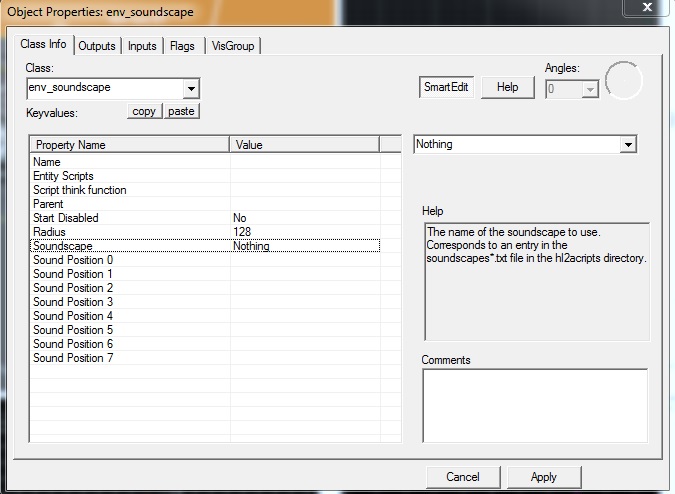
  • Start Disabled – Stay dormant until activated.
  • Radius – Defines the entity’s sphere of influence. Players must also be able to see the entity for it to trigger. -1 means infinite range.
  • Soundscape – The name of the soundscape to play.
  • Sound Position 0-7 – Entities which define the location from which any positioned sounds play. Must be entities that the client knows about (e.g info_target or anything visible).

Soundscape List for CS:S – Click Here (This is CS:Source soundscape not all will work with CS:GO)

Samples of the CS:GO Soundscape – Click Here (Video is provided by 3klicksphilip)

So set the soundscape property value to the soundscape that you want (I’ll use aztec.outdoors)

soundscapeset

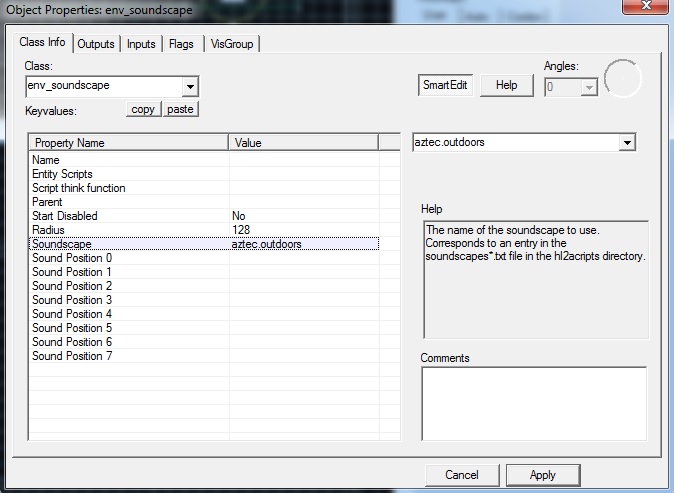
Next you would want to increase the radius of which where you are able to hear the soundscape. You can do this by increase Radius value or expand the circle in one of the viewports.

soundscapesetradius

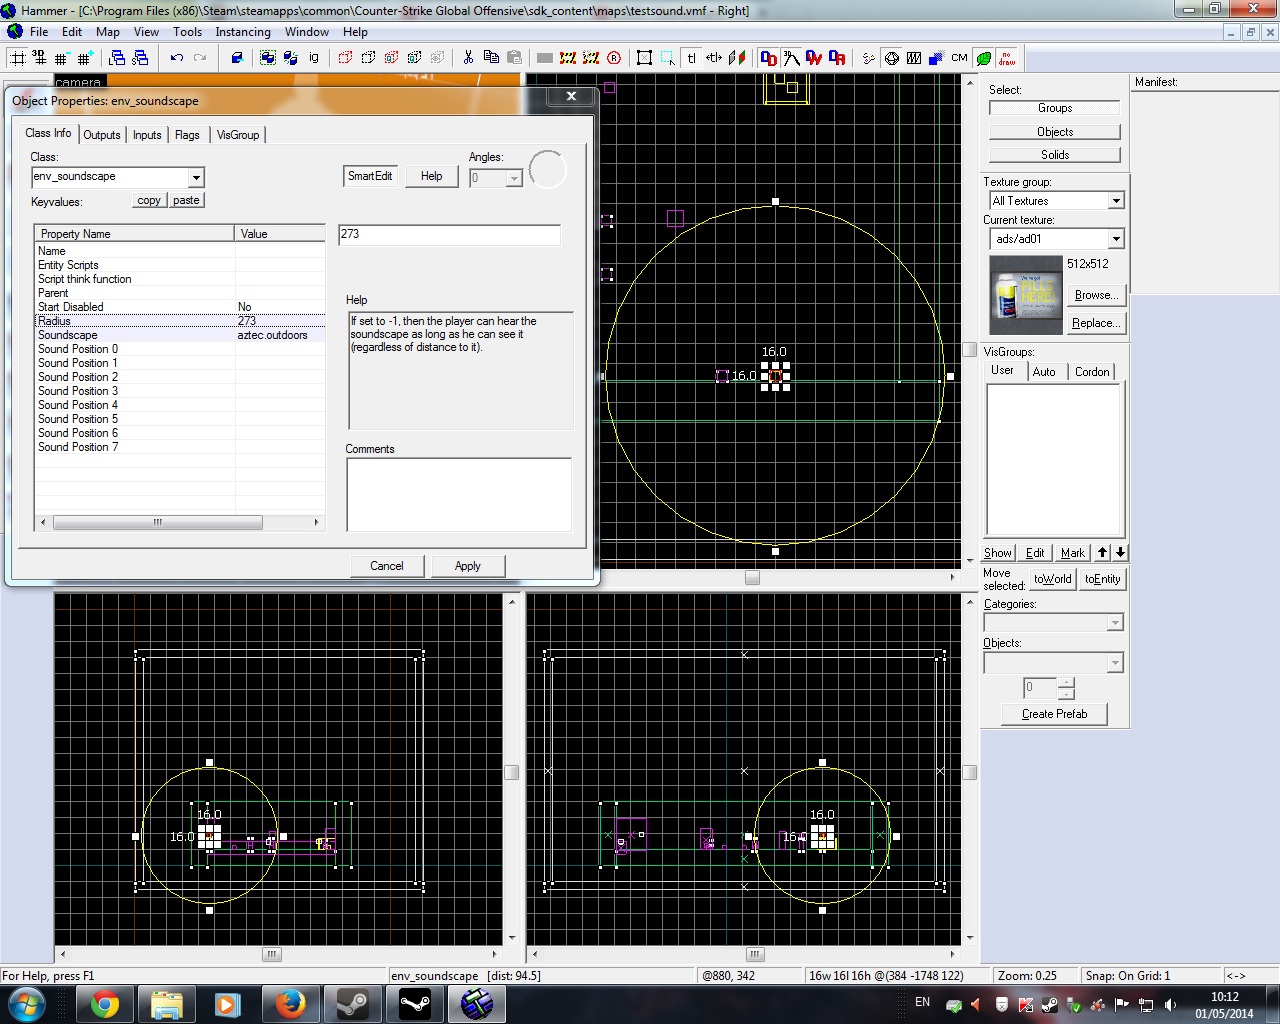
To make it work you will need to leave Start Disabled property at No. I am disabling it because, I want it to be triggered by a button.

Compile and run the map for hear soundscape in-game.


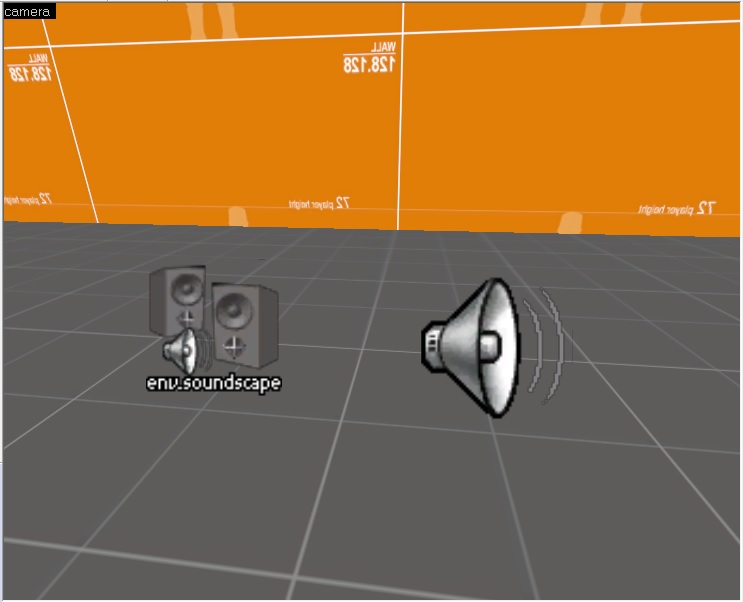
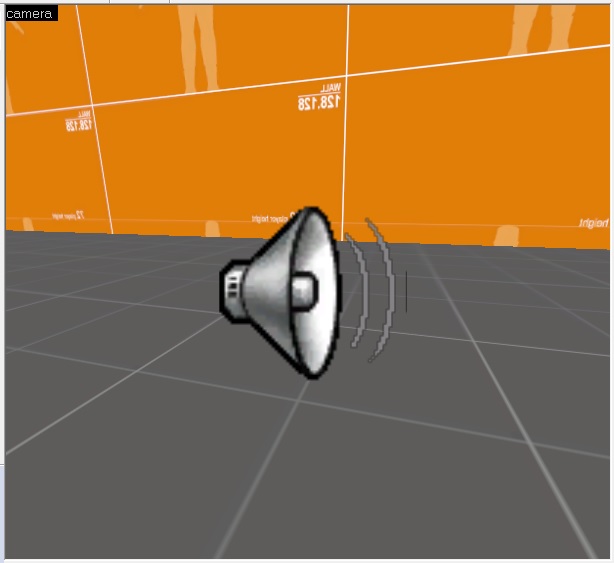
ambient_generic – Is a point entity available in all Source games. It plays a sound, either once or on loop, and either from a location in the world or globally. Use it to play and control a soundscript sound, a raw .wav sample or a scripted sentence.

ambient

Select the entity tool and search in the objects dropdownlist for ‘ambient_generic’, then left click in the level to add the entity. Double click the entity to open its properties;

ambientprop

  • Sound Name – Name of the Game Sound entry for the sound to play. Also supports direct .wav file names.
  • Volume – Sound volume, expressed as a range from 0 to 10, where 10 is the loudest.
  • Pitch – Pitch, where 1 is low, 100 is normal, and 255 is high.
  • Start Pitch – Start Pitch.
  • Max Audible Distance – Maximum distance at which this sound is audible.
  • Dynamic Presets – Various DSP (Digital Signal Processor) effects that can be applied.
  • LFO type – Type of Low Frequency Oscillation to employ. Options are; Off (default), Square Wave (alternate between low and high), Triangle Wave (sharper transitions), Random.
  • LFO rate – How frequently the LFO effect repeats itself.
  • LFO mod pitch – Affects the sound pitch. Higher numbers change the pitch more.
  • LFO mod volume – Affects the volume of the sound, causing it to “pulse”.

Flag options;

  • Play everywhere – Sound always plays from all speakers at its configured volume.
  • Start Silent – The map will start without this sound playing. Enabled by default.
  • Is Not Looped – Changes how the ambient_generic handles stopping and starting playback.

When working with ambient_generic all you really need to do is select Sound Name.You do that by selecting the Sound Name properties and click the browse button. Sound Resources Browser window will pop up.

ambientsoundname

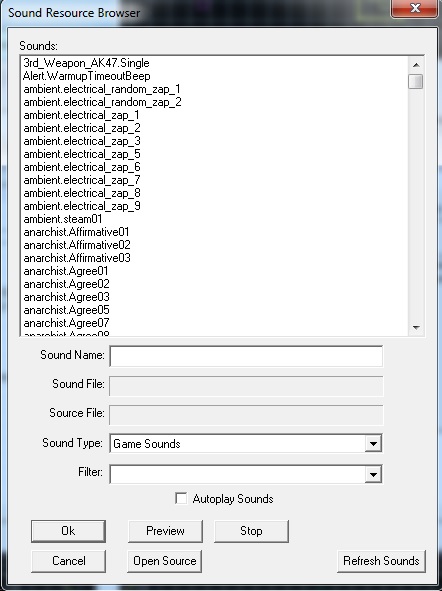
Make sure that ‘Game Sounds’ is selected as the Game Type. Then filter for the sound that you want to add. If you are unsure about the Sound file, select it and click preview to play the sound file (If it doesn’t play then its corrupted or doesn’t work). If you have found the sound file that you wanted, then selected and press ‘Ok’ or double click the file.

You can leave everything on default. I’ll give it a name so then I could call it when a user presses a button, or call it when triggered by event.

compile and run the map to hear sound in-game.


Video


In this post will go through different types of lights available in the Counter-Strike:Global Offensive-SDK. I’ll also give tutorials on how add some of these lights, show how they work and show how they would look like in-game.

The types of lighting in source sdk can be split up into two:

Static Sources, static lighting is compiled into Lightmaps, which illuminate brushes and models, and Cubemaps, which provide static reflection. Dynamic Sources, dynamic lighting is calculated at runtime, which makes it expensive to render. This includes entity lights:

  • light – A static, omni-directional point light source (e.g. naked light bulb)
  • light_spot – A static, uni-directional point light source (e.g. torch or flashlight).
  • light_environment (Covered this in the last post here: http://goo.gl/VxnKGw )
  • light_directional –  It is a directional light with no falloff.
  • light_dynamic -A simple, uni-directional dynamic light that can be moved, turned, and adjusted.
  • point_spotlight – A dynamic spotlight beam effect, with an optional dynamic light source where it hits a surface.
  • beam_spotlight – Will draw a beam when the player views it side on, and a halo when it’s facing towards the player.

MAT_FULLBRIGHT

If you compile your map and run it in-game, Source will default your lighting to full bright. Once you insert a light into your map, the engine will switch full bright off and begin calculating your lighting. The console command for full bright are:

  • mat_fullbright 0
  • mat_fullbright 1

Mat_Fullbright is a useful command in Source. You can use it to gameplay test your map without worrying about setting up lights. Unfortunately right now, mat_fullbright is buggy and does not produce full bright map.

Adding Light to Map

Enough with the back ground lecture, now I’ll show you how to add certain light entities into your map. I’ll go through these light entities; light, light_spot, point_spotlight and beam_spotlight.

To add light entity first select the entity tool entity tool

Then type in the bottom right hand side of the hammer editor, under object ‘light’

Then to add the light entity just left click somewhere in the world (Where you would like to place it, just make sure not add it within an existing brush/object)

Hint – The x simple on the entity represents the centre, but can also represent the point of where the light starts emitting. So make sure if you want to light the objects/brushes around do not have x within an object/brush or prop.

light

Double click the entity to display the properties to alter any necessary settings.

lightprop

Useful fields that you need to take into consideration when using light entity:

  • Name – Could give name to the light entity for reference or parenting.
  • Brightness – takes four values, first three (255 255 255) is the colour of the light. The fourth (200) is the brightness of the light.
  •  Appearance –  Is how the light could appear in-game. Normal is constant light emission, Fluorescent flicker is that light will flicker and you will get the rest.

Here is in-game view of light at with different values for fields. (R-L) Standard light, Brightness set at 750, Colour change to blue and final appearance set to flicker (unfortunately unable to view the flicker in action with a screenshot).

2013-12-04_00001

Now we move on to light_spot. This entity only works by emitting light in one direction and it is not as bright as light entity. To add the entity select the entity tools and filter for ‘light_spot’ under objects in the right hand side of the hammer editor.Left-click where you would like to place the entity in the world.

light_spotprop

Useful fields that you need to take into consideration when using light_spot entity:

  • The ones that were included in the light entity properties (Name, brightness and appearance).
  • Pitch Yaw Roll (X Y Z) – The direction of where the light is emitting.
  • Inner (Bright) angle – Focus light.
  • Outer (Fade) angle – Outer fade light.

Here is in-game view of light_spot at with different values for fields. (R-L) Standard light_spot, Brightness set at 750, Colour change to blue and last has its Inner and outer set to 60 and 75 (Notice the light cover more surface area and first one)

2013-12-04_00002

beam_spotlight and point_spotlight are similar so I’ll cover them together (I sometimes forger which does what). Again after selecting the entity tool, filter the object for either ‘beam_spotlight’ or ‘point_spotlight’ (depending on what you need). Left-click on the in the world to add the entity. The arrow should indicate the direction of where the entity will emit.

beam&point

The additional field provided in their properties that will interest you are:

  • Spotlight Length
  • Spotlight Width

I do not need to need explain these, I’m sure you already understand what they point to.

Here is in-game view of beam_spotlight(top) and point_spotlight(bottom). Main and most notisable difference is that point_spotlight is stronger and brighter than beam_spotlight.  (R-L) Standard values, Colour change to red, then I halved the spotlight length and width. The last one is mistake, its the same as standard values.

2013-12-04_00003

I think you have noticed that beam_spotlight and point_spotlight do not provide any light to the environment. They are more than an effect that helps make the map or objects more interesting.

I’ll not show light_directional because there isn’t much use for it, as well as I’m not sure how to set it up, as I never was required to use it. light_dynamic cannot be used alone, and as I haven’t introduced props yet I have decided to save this for a future post.

In this post I will explain the basic architecture and how to create different shapes such as block, torus, spike, sphere, cylinder and arch.

Before starting your map in CS:GO, you need to know key unit dimensions for characters and architecture. This includes character crouching, standing, width. Wall heights, depths, stairs height and depth, windows, doors etc. You can’t fix this in the later stages of your production, without remaking and reworking your geometry. So you must make sure that when you build your first block, that they look correct. I recommend  creating a Test Map where you can test the objects development before adding them into your official map.

Player Dimensions

  • Player Height Standing: 72 Units
  • Player Height Crouching: 54 Units
  • Player Width: 32 Units

Jumping Height

  • Jump: 54 Units
  • Crouch Jump: 64 Units

Minimum Height & Geometry Constraints for Player Movement

  • Minimum Player Height to Pass Under Standing: 73 Units
  • Minimum Player Height to Pass Under Crouching: 55 Units
  • Minimum Player Height to Pass Width: 33 Units
  • Maximum Object Height for Stepping: 18 Units

Average Wall Height (Use dev/dev_measurewall01c Texture)

  • Average Wall Height: 128 Unit
  • Average Wall Depth: 16 Unit

Shapes

To create shapes first need to select the Block Tool or Shift + B

In side, top or front view, draw out brush template by left click and drag. This will create a brush template.

Right click then select Create Object or press enter to create geometry brush. The standard brush will be Block, but you are able to select different shapes from a list.

Object shapes

Shapes

Before deciding on the object shape that you wish to create make sure to measure out object template, just like you did when creating block object either in the top or front view windows.

If you select the cylinder option from objects drop list then it will create cylindrical shape to the object facing up.

Cylinder Object

If you select the spike option from the objects drop list, then it will create a pyramid shape.

Spike Object

Sphere option will allow you create sphere.

Sphere Object

To create Arch or Torus then the SDK will require more information from you to create these objects.

Lets start with Arch, after right clicking and selecting Create Object or hitting Enter, a pop up will show giving options to set additional information about the arch.

Arch ObjectThe ones you need to familiarise yourself with are:

  • Wall Width – Width of the arch wall, the greater the number the thicker the walls, too much can turn arch to semi-circle.
  • Number of Sides – Number of sides that makes up the arch, the greater the number the smoother the arch.
  • Arc – This is the number of degrees the object will span. 360 full circle and 180 is semi-circle.
  • Preview – Will give example view on how it should look when created. This is recommended to be used after changing the values of the parameters.

Now move on to the Torus. After selecting it from the drop list and creating the object a pop up will show.

Torus

It has similar parameters to the Arch with edition of:

  • Cross-Section Radius – This represents the side of the hole. Smaller the value the bigger the hole.
  • Rotation Sides – The amount of faces/sides in total volume of the torus.
  • Rotation Arch – The amount of rotations in degrees. (360 = one complete rotation)

This is in-game view of the objects

Objects


(Torus may have few texture problems)